Posts

Showing posts with the label programs

How to add Copy To and Move To buttons to the right-click menu

Image
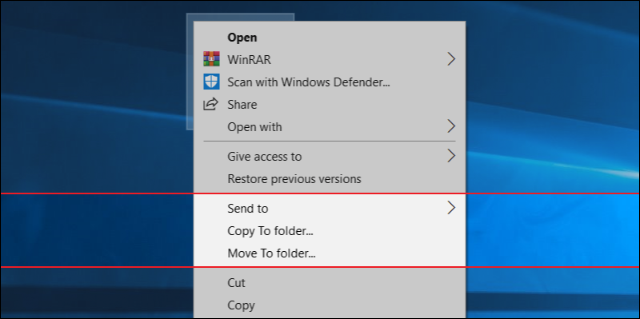
 Often while using the computer we need to copy or transfer a file from one place to another on the hard disk, whether transferring a file from Partition "D" to Partition "C" on the desktop, or from the flash drive to the hard drive. When you want to, you have to select the file and right click to get the option "Copy" for copying and "Cut" for transfer, select the appropriate option and then go to the folder you want to add it to. The problem with this method is that it is difficult when it comes to copying or moving multiple files from different folders, so you will find that it is impractical and wastes a lot of time. In this case, the "Send to" option is usually used to make the command smooth and fast, as you specify the location from the submenu and a shortcut to the specified files is created immediately in the specified location. But the shortcuts don't always work, as the original copy must be stored on the same hard d

How to Check harddisk status

Image
Checking the hard disk status is a very important matter for all computer and laptop users who are going to buy a used or new hard disk, because hard disk is the most important part of a computer, as it stores your important data and files. Even it is possible to replace any part of the computer with ease just by removing the old part and installing the new one, but when it comes to the hard disk, the matter is not so easy as you will lose your data. Sometimes the hard disk may be exposed to certain problems that affect its performance, which leads to the slowdown of the device significantly, but there are many ways through which you can check the status of your personal hard disk to find out if there are problems or not and work to solve them, if any. Below we offer you the best ways to check the status of your hard disk, whether using programs or without programs. Optimization and defragmentation of hard drives in Windows 10 The first way to check and improve the state of the persona

TunePat Netflix Video Downloader 1.2.4 Multilingual + Crack

Image
 TunePat Netflix Video Downloader 1.2.4 Multilingual + Crack TunePat Netflix Video Downloader is designed to help users download movies and TV shows from Netflix and watch Netflix videos offline on any device without spending internet traffic and without disrupting Netflix's limitations. And it is extremely easy to use. Just copy any Netflix video URL, paste it, click the "Download" button, wait for a little and enjoy it! Features: - Download Movies and TV Shows from Netflix TunePat Netflix Video Downloader is the best solution to help you enjoy Netflix movies & TV shows on any devices without spending internet traffic and without disrupting Netflix limitations. With TunePat Netflix Video Downloader, you can enjoy Netflix movies and TV shows on iPhone, iPad, Android phones & tablets, TV and any other MP4 compatible devices as well. - Support downloading HD Netflix video As an HD video downloader for Netflix, TunePat Netflix Video Downloader supports downloading HD

Duplicate Files Fixer v1.2.0.10546 + Fix

Image
Duplicate Files Fixer v1.2.0.10546 + Fix   Recover disk space in seconds by removing duplicates! Did you know that your system often accumulates too many duplicate files that eat up a lot of storage space? Duplicate Files Fixer is a simple tool designed to find and delete all such duplicate files effortlessly! So you have got loads of files to be scanned. But that’s perfectly alright. Duplicate Files Fixer will give you a speedy yet accurate scan irrespective of volume of files you have. Features : Accurate identification of duplicates Duplicate Files Fixer identifies all identical file formats accurately. Find identical texts, photos, audio, and video files is easy with this extremely user-friendly software. Create Backups Before Deleting You need not think about recovering deleted files. Duplicate Files Fixer gives you the option to backup all your files before you delete them. No worries there! Folders exclusion supported You might not want to scan all your folders for copies. This
Troubleshoot blue screen errors   A blue screen error (also called a stop error) can occur if a problem causes your device to shut down or restart unexpectedly. You might see a blue screen with a message that your device ran into a problem and needs to restart. On this page, we’ll take you through a series of troubleshooting steps to try and help you figure out the cause of the blue screen error and how to resolve it.  The steps in this article are intended to help troubleshoot common stop error codes, such as the following: ·          CRITICAL_PROCESS_DIED ·          SYSTEM_THREAD_EXCEPTION_NOT_HANDLED ·          IRQL_NOT_LESS_OR_EQUAL ·          VIDEO_TDR_TIMEOUT_DETECTED ·          PAGE_FAULT_IN_NONPAGED_AREA ·          SYSTEM_SERVICE_EXCEPTION ·          DPC_WATCHDOG_VIOLATION   Notes ·          You may also receive hexadecimal error codes, such as 0x0000000A, 0x0000003B, 0x000000EF, 0x00000133, 0x000000D1, 0x1000007E, 0xC000021A, 0x0000007B, 0xC000000F,

Windows 10: How to Turn on or Turn off Location Services

Image
 How to Turn on or Turn off Location Services Privacy conscious? We show you how to turn off location services in Windows 10 or turn them on again to suit your preferences. Windows 10’s location services are a somewhat controversial feature. On the one hand, some apps require them to provide useful functionality, but on the other, some see it as an invasion of privacy. This is only compounded by seemingly random messages that “Your location is currently in use” or “Your location has recently been accessed”. We’re going to show you how to turn off location services if you wish, but also talk through adjusting location settings to be on, but more conservative. Should location services be on or off? Though some fear that Windows 10 will be checking their location constantly, if they enable the geolocation service, that isn’t the case. For the most part, the OS confirms exactly to the settings you provide, it’s just that many don’t know how to configure location services or have forgotten

Sign in Windows 10 with Local Account Instead of Microsoft Account

Image
Sign in Windows 10 with Local Account Instead of Microsoft Account Have you  upgraded your Windows 7 PC to Windows 10 ? You may be asked to login windows with Microsoft account, just because you log into Xbox. If you are not used to getting into Windows with Microsoft account, here will show you  how to sign in Windows 10 with local account instead of Microsoft account . Steps as below: Step 1:  Click on Windows icon to open Start menu, and select  "Settings ". Step 2:  Click on  "Accounts"  on the Settings screen. Step 3:  Select the first option  "Your account"  on the right panel, and then click on the  "Sign in with a local account instead"  link. Step 4:  Type in the Current password on the text box, and then click on  "Next" . Step 5:  Enter the local account information, that including user name, password, and password hint. And then click on  "Next ". Step 6:  Click on  "Sign out and finish" , and then log in

Switch Local Account to Microsoft Account on Windows 10

Image
On Windows 10, if you were login with local account, you have to sign in with the Microsoft live account again in order to use the Xbox, OneDrive, or Cortana search box etc. That is troublesome and will waste much of time. So I think it is better to  sign in Windows 10 with the Microsoft account instead of local account  at the beginning. With Microsoft account, you can access to apps and games from the Windows Store, and see your settings and other things. And here in this article will show you how to  switch local account to Microsoft account on Windows 10 . Steps as below: Step 1:  Open Account Settings on Windows 10. 1.1 Click on Windows icon   on the bottom-right corner, click on your user account on the top, and then select  Change account settings . 1.2 Or click on  Settings  on the Start menu, and then select  Accounts  on the settings screen. Step 2:  On the Accounts settings, click on the link:  Sign in with a Microsoft account instead . Step 3:  Enter the Email or Phone, and