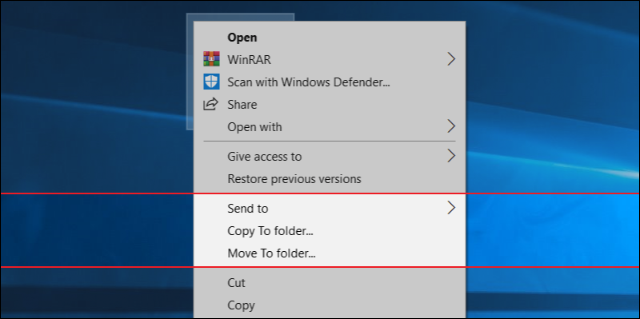
How to add Copy To and Move To buttons to the right-click menu
Often while using the computer we need to copy or transfer a file from one place to another on the hard disk, whether transferring a file from Partition "D" to Partition "C" on the desktop, or from the flash drive to the hard drive. When you want to, you have to select the file and right click to get the option "Copy" for copying and "Cut" for transfer, select the appropriate option and then go to the folder you want to add it to. The problem with this method is that it is difficult when it comes to copying or moving multiple files from different folders, so you will find that it is impractical and wastes a lot of time. In this case, the "Send to" option is usually used to make the command smooth and fast, as you specify the location from the submenu and a shortcut to the specified files is created immediately in the specified location. But the shortcuts don't always work, as the original copy must be stored on the same hard drive. Fortunately, there is a solution that we will share with you on this topic.
As the title indicates, the solution is to add the "Copy To" and "Move To" button to the menu that appears when you right-click on any file or folder, so that the moving and copying process is easy as is creating shortcuts via the "Send to" button. Unfortunately, Windows does not contain any settings that allow us to do this easily. What we will simply do is make a simple adjustment to the registry. So, before you start following any steps mentioned in this topic, you should first review the explanation of making a registry backup to restore it in case of problems.
There is also a note that you should take into consideration before proceeding with the steps below, which is that the "File Explorer" tool in Windows 10 already contains "Copy To" and "Move To" buttons, but they do not appear in the Right Click menu, but rather after you double-click on the The "Home" tab in the toolbar or the "Ribbon Bar" at the top. Once you select any file or folder, you will find that these buttons are available for clicking, just click on the appropriate button and you will get a submenu containing the main folders you can move or copy the file to immediately as is The same is with the "Send To" option. But it is still better to have these two options on the right-click menu in order to speed up your daily file management tasks, or in case you prefer to disable the toolbar in the "File Explorer" tool. So here's what you should do about it .
Note that this method works for any version of Windows, from Windows XP to Windows 10. The first step to start with is to open the "Registry Editor" tool by clicking on the "Windows + R" keys together on the keyboard, then typing "regedit" in The "Run" window that will appear in front of you on the screen. Then, after you press the "Enter" button to execute the command, the "Registry Editor" window will be displayed in front of you. Now go to the following path:
HKEY_CLASSES_ROOT\AllFilesystemObjects\shellex\ContextMenuHandlers
On the right side of the "Registry Editor" window, right-click on "ContextMenuHandlers" then point the mouse pointer to New and press Key from the submenu to create a new key inside the registry. You will rename this key to the following code and press "Enter", which is the code for activating the command " Move To ":
{C2FBB631-2971-11d1-A18C-00C04FD75D13}
{C2FBB630-2971-11D1-A18C-00C04FD75D13}
After completing the above-mentioned modifications in the registry, close the "Registry Editor" window and go to any file or folder and click on it right. You will notice that "Copy To folder" and "Move To folder" appear just below the "Send to" option. By clicking on either of these two options, a pop-up window will appear for you where you specify the folder or the location from which you want to move or copy (depending on the type of option used) the file to, and now press the confirmation button at the bottom to complete the process immediately instead of having to go to the desired folder and make "Paste" or paste in it.
To save your time, we prepared files ready to implement the required adjustments in the registry instead of having to do it yourself. Just click here to download a zip file from which you will extract two files, the first is "Add" to add "Copy To" and "Move To" and the second is "Remove" to remove from the right-click list. Just double click on the file and then press the Yes button to confirm the implementation of the registry changes, then click OK. And that's all about adding the "Copy To" and "Move To" buttons to the right-click menu in Windows.


Comments